


Guide / Artwork & design / Chapter 5.2
Bleed, trim and safe zones.
Three invisible lines decide whether your printed box looks crisp or cut off. Here's what bleed, trim and safe zones are, why our full-coverage templates use 10mm bleed and a 10mm safe zone, and how digital printed boxes differ.
The short answer
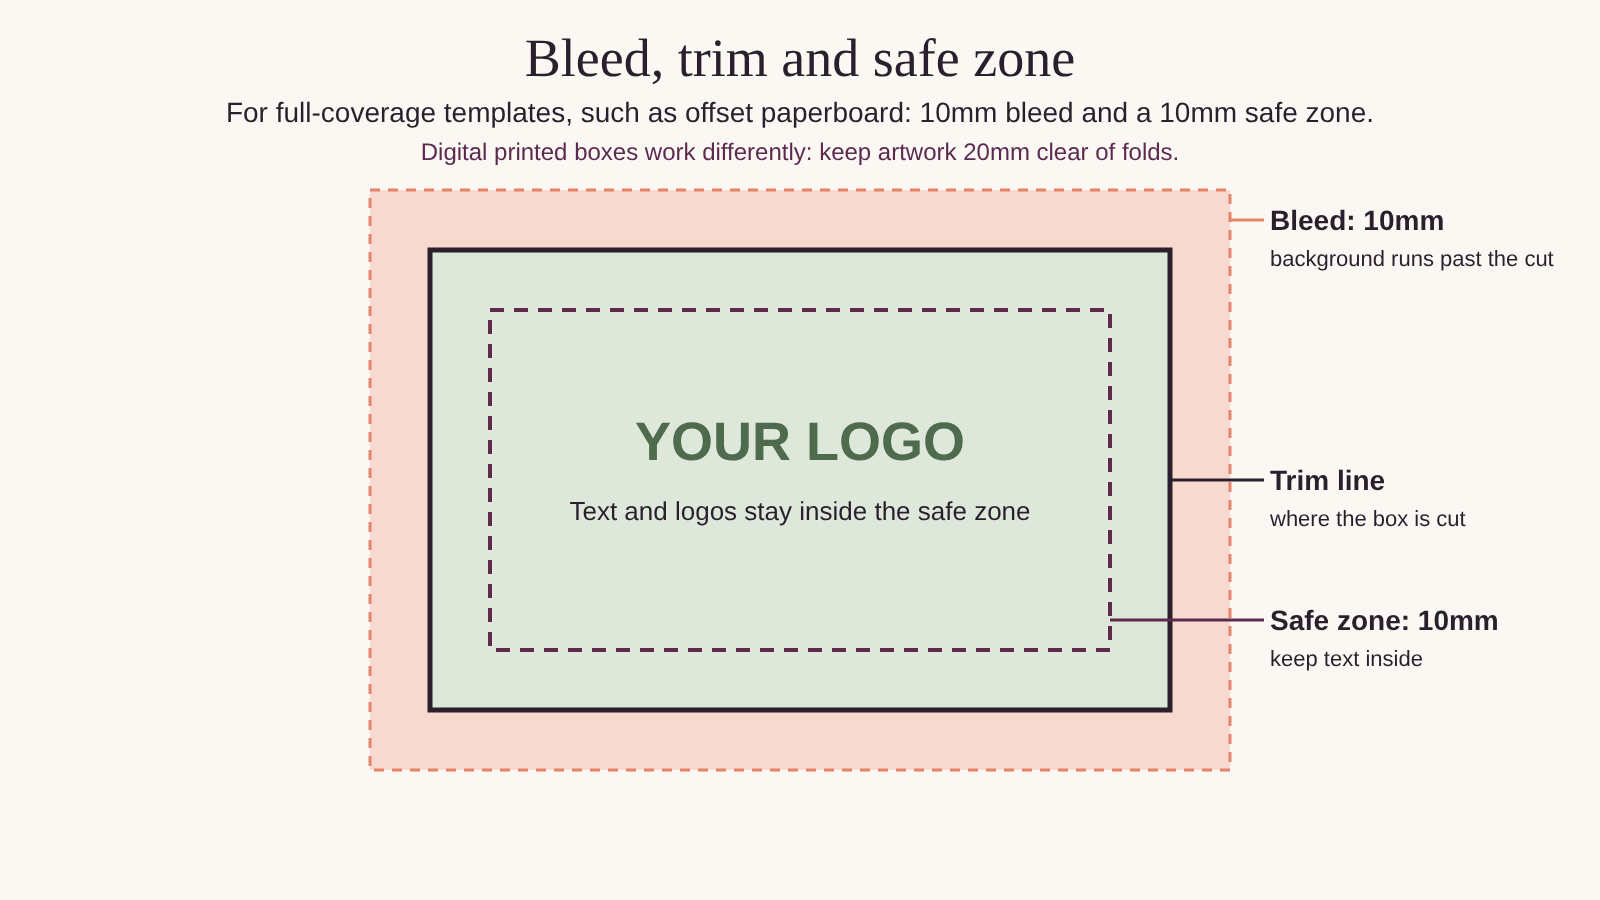
The trim line (or cut line) is where the box is cut. Bleed is extra artwork that extends past the trim line, so colour runs right to the edge with no white slivers. The safe zone is a margin inside the trim and fold lines where all important text and logos must sit, so nothing gets cut off or wrapped around a fold. Our full-coverage templates, such as offset paperboard, use 10mm bleed and a 10mm safe zone. Digital printed boxes don't print to the edge: they need artwork 20mm from fold edges instead.
Why printing needs bleed
Cutting and folding happen fast, on large sheets of board. Every cut can land slightly to one side of the line. If your background stops exactly at the trim line, any small shift shows a thin strip of unprinted board along the edge.
Bleed solves this. Because your background carries on past the trim line, the cut always lands inside printed artwork, and the edge looks clean.
Why you need a safe zone
The same small movement works the other way too. Text or a logo placed right on the edge can be trimmed, or end up wrapped around a fold. The safe zone keeps everything that matters well away from the edges.
- Inside the safe zone: logos, text, website addresses, social handles, barcodes and anything that must be read.
- Can run into the bleed: background colours, patterns and images that are meant to go to the edge.
- Remember the folds: treat fold lines like edges. Keep text 10mm away from them too.
Digital printed boxes work differently
The 10mm bleed and safe zone apply to full-coverage templates, such as offset printed paperboard boxes. Our digital printed kraft and white boxes don't print edge to edge, so there's no bleed to set up. Instead:
- Print area: top, front and back of the box only. Side panels can't be printed.
- Clearance: keep all artwork at least 20mm from fold edges.
- Width: a maximum print width of 280mm.
Always work from the template for your exact product and print method. See our digital print specifications and artwork requirements.
The three zones at a glance
For full-coverage templates, such as offset paperboard. Digital printed boxes need 20mm clearance from folds instead.
| Zone | Where it is | What goes there |
|---|---|---|
| Bleed | 10mm outside the trim line | Background colour, patterns and images that run to the edge |
| Trim line | The edge of the finished panel | Nothing important sits on this line |
| Safe zone | 10mm inside the trim and fold lines | All text, logos and key information |
What it means for you
The same question, answered for where your business is today.
Choose your stage at the top of the page to open the advice for you.
Start-up · under 100 units
If you're digitally printing a logo on a kraft box, there's no bleed to set up, because nothing runs to the edge. Keep your logo at least 20mm from the folds, on the top, front or back.
Ask us to check your placement before you approve the proof.
Growing · 100 to 2,499 units
Once you print full-colour backgrounds or patterns, bleed becomes essential. On full-coverage templates, set your artwork up with 10mm bleed from the start and you won't need to fix it later.
Try this: turn the dieline layer on and off to check nothing important sits near an edge or fold.
Enterprise · 2,500 units and more
Build bleed and safe zones into your artwork templates for every box in your range, so every designer and agency works to the same rules.
Include the bleed and safe zone requirements in your packaging specification.
Common mistakes
- 1No bleed on full-colour designs. Backgrounds that stop at the trim line can leave thin white edges after cutting.
- 2Text too close to a fold. Text that crosses or touches a fold wraps around the edge and becomes hard to read.
- 3Stretching artwork to make bleed. Stretching distorts images. Extend the background or pattern instead.
- 4Borders close to the edge. A thin border right next to the trim line shows any small movement in cutting. Keep borders well inside, or avoid them.
Bleed and safe zone questions
What is bleed in packaging printing?
How much bleed do you need?
What is a safe zone?
Do I need bleed for a simple logo?
Will you check my artwork?
Keep reading
Boxes you can print
Want us to check your artwork?
Send us your file and the box you're printing. Our team will check the bleed and safe zone and email a digital proof, typically within 1 business day.