Key Highlights
- Custom labels offer a cost-effective way to brand products without committing to large packaging print runs
- A simple step-by-step process can help businesses design, print, and apply labels professionally
- Real-world use cases show how labels improve flexibility, especially for businesses with multiple product variations
In today’s competitive market, packaging flexibility is just as important as visual appeal. Businesses are constantly looking for ways to maintain a professional brand image while staying agile—and this is exactly where custom labels come in.
Whether you’re scaling an eCommerce store or managing multiple SKUs, understanding how to make custom labels can save time, reduce costs, and elevate your presentation without overcomplicating your operations.
This guide walks you through everything you need to know—from design to application—so you can confidently create custom printed labels that work for your business.

Why Custom Labels Are a Smart Business Move
For many businesses, especially those with evolving product lines, printing large quantities of branded packaging simply isn’t practical.
Custom labels provide:
- Flexibility to update designs or product information
- Lower upfront costs compared to bulk packaging runs
- Faster turnaround for new product launches
- Consistent branding across different packaging types
According to data from Statista, the global label market continues to grow steadily, reflecting increased demand for adaptable packaging solutions across industries.
Step 1: Define the Purpose of Your Label
Before diving into design, clarify what your label needs to achieve.
Ask yourself:
- Is it for branding, compliance, or both?
- Will it include product details like ingredients or instructions?
- Where will it be applied—boxes, jars, bags, or bottles?
Clear goals will guide your design decisions and ensure your label serves both functional and visual purposes.
Step 2: Choose the Right Label Material
Material selection plays a critical role in durability and presentation.
Here’s a quick comparison:
| Material Type | Best Use Case | Key Benefit |
|---|---|---|
| Paper Labels | Dry goods, boxes | Cost-effective and versatile |
| Vinyl Labels | Bottles, outdoor products | Water-resistant and durable |
| BOPP Labels | Food, cosmetics | Oil and moisture resistant |
| Kraft Labels | Natural or eco brands | Rustic, organic appearance |
Step 3: Design Your Label
Design is where your brand comes to life. A well-designed label should be clear, readable, and visually aligned with your brand identity.
Key design elements:
- Logo placement
- Brand colours
- Typography
- Product name and details
- White space for readability
Tools like Canva and Adobe Express make it easy to create professional designs without advanced design skills.
When learning how to make custom labels, simplicity often delivers the most professional results. Overcrowded designs can reduce clarity and impact.
Step 4: Select the Right Size and Shape
Your label should fit your packaging seamlessly.
Common shapes include:
- Rectangular (versatile and cost-effective)
- Circular (popular for jars and candles)
- Custom die-cut (unique brand differentiation)
Measure your packaging carefully and test mock-ups before finalising production.
Step 5: Choose a Printing Method
There are several ways to produce custom printed labels, depending on your volume and budget.
Printing options:
| Method | Best For | Pros | Cons |
|---|---|---|---|
| Digital Printing | Small to medium runs | Fast, flexible | Higher cost per unit |
| Offset Printing | Large volumes | High quality, cost-efficient | Requires bulk orders |
| Thermal Printing | Shipping labels | No ink required | Limited design options |
Step 6: Test Before You Scale
Before committing to a large order:
- Print sample labels
- Test adhesion on your packaging
- Check durability under real conditions (heat, moisture, handling)
This step is often overlooked but can prevent costly mistakes.
Step 7: Apply Labels Professionally
Even the best design can look unprofessional if applied poorly.
Tips for clean application:
- Ensure surfaces are clean and dry
- Use alignment guides for consistency
- Apply labels slowly to avoid air bubbles
For larger operations, label applicator tools can improve efficiency and consistency.
Case Study:
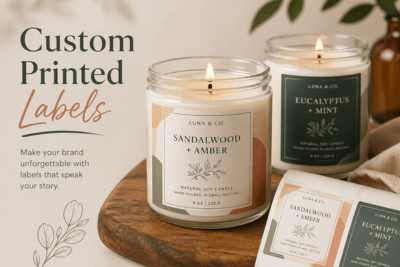
A growing candle brand approached PackQueen with a common challenge—how to manage multiple product variations without overinvesting in packaging.
The Challenge
The business offered a wide range of fragrances, each requiring distinct branding. Printing separate boxes for every scent would:
- Increase production costs significantly
- Require large minimum order quantities
- Limit flexibility for seasonal or limited-edition scents
The Solution
PackQueen recommended a smarter approach: use a single, high-quality generic box paired with custom printed labels for each fragrance.
These labels were designed to:
- Clearly differentiate each scent
- Maintain consistent branding across all products
- Allow easy updates for new or seasonal variations
The Result
- Reduced packaging costs by eliminating multiple box print runs
- Improved operational flexibility for new product launches
- Maintained a professional and cohesive brand appearance
This is a practical example of how custom labels can simplify logistics while enhancing brand presentation.
Common Mistakes to Avoid
Even with the best intentions, businesses can run into issues when creating labels.
Watch out for:
- Overcomplicated designs that reduce readability
- Incorrect sizing that doesn’t fit packaging properly
- Choosing the wrong material for the product environment
- Skipping testing before bulk printing
Avoiding these pitfalls ensures your labels deliver both form and function.
Trends in Custom Label Design
Staying up to date with design trends can help your products stand out.
Current trends include:
- Minimalist designs with strong typography
- Sustainable and recyclable materials
- Matte finishes for a premium look
- Transparent labels for a “no-label” appearance
According to Packaging Digest, brands are increasingly prioritising sustainability and simplicity in label design.
How Custom Labels Support Business Growth
As your business grows, flexibility becomes essential.
Custom labels allow you to:
- Launch new products quickly
- Test limited-edition offerings
- Adapt branding without major reprints
- Maintain consistency across multiple packaging formats
For many businesses, mastering how to make custom labels is not just a design skill—it’s a strategic advantage.
Bringing It All Together
Custom labels are one of the most practical tools available for modern businesses. They bridge the gap between cost efficiency and professional branding, allowing you to stay agile without compromising quality.
From selecting materials to refining your design and testing your final product, each step plays a role in creating labels that truly represent your brand.
As demonstrated in the candle business case study, the right label strategy can unlock flexibility, reduce costs, and support long-term growth—all while maintaining a polished, professional look.
Frequently Asked Questions
1. What is the best material for custom labels?
The best material depends on your product. Vinyl and BOPP are ideal for moisture resistance, while paper works well for dry goods and packaging.
2. How do I choose the right size for my label?
Measure your packaging carefully and test sample sizes to ensure the label fits well without overcrowding the design.
3. Can small businesses benefit from custom labels?
Yes, custom labels are especially useful for small businesses because they reduce the need for large, expensive packaging orders.
4. Are custom printed labels durable?
They can be highly durable if you choose the right material, such as vinyl or BOPP, and test them under real-world conditions.
5. How can I make my labels look more professional?
Focus on clean design, consistent branding, high-quality materials, and precise application to achieve a polished result.